Multiple Printed Circuit Boards on an ExpressPCB Panel
By Kerry Imming, Rochester, MN
Overview
This article describes the method I used to combine two mini-board layouts into a single board (which I’ve dubbed a multi-board). A small segment of perforation vias was used between the boards to make them easy to separate. This method could be expanded to build multiple circuit boards onto a single ExpressPCB board. While this method does not violate any ExpressPCB policies, this write-up is not meant to imply any endorsement by ExpressPCB.
Background
I have been using ExpressPCB to build printed circuit boards for many years and am very satisfied with their service and prices. They have a service they call MiniBoard that allows you to get three 3.8” x 2.5” 2-layer boards for $61.80 ($51.00 + $10.80 shipping). For $85.80 ($75.00 + $10.80 shipping) these can be production quality boards (MiniBoardPro) with solder mask and component-side silk screen. With their MiniBoard or MiniBoardPro service you can order boards on Monday and have them delivered to you by the end of the week. ExpressPCB provides free schematic and board layout software that makes it very easy for the beginning user to generate and order circuit boards.
Goal
The goal of the procedure described here was to save money when having 10-12 boards built of two different mini-board designs. When building more than prototype numbers of boards, there is a setup fee (currently $245) that must calculated into the cost of the boards. This means that you have to order more than 10 boards just to match the price of the MiniBoard prototype price. By combining the two PCBs into a multi-board and ordering them as one board, the setup fee was effectively cut in half.
Cost Comparison
Shown here is a comparison of the prices of boards ordered using the standard process and the two-board multi-board process described here. The cost of shipping is not included since it is roughly the same in either case. The cost equation is available on the ExpressPCB web site and in the resources section below.
MiniBoardPro : $25 per board (Qty 3)
Production: $28.23 per board (Qty 10), $15.98 per board (Qty 20)
2xPCB Production: $15.79 per board (Qty 10x2*), $9.67 per board (Qty 20x2)
* Note that this is 10 boards of each type
Ordering boards as two-per-panel reduced the cost per board from $28.23 to $15.79, a 44% savings.
Procedure Summary
The following steps describe the process I used at a high-level. More details are provided in the sections below.
- Create a PCB outline with the two boards separated by 0.100” and a connection point of about one inch. (or you can start with the provided template if you are using two MiniBoards.
- Copy the layout for one of the MiniBoards into the top section of the multiPCB layout. Be sure to unlock the planes so they get copied along with the components.
- Repeat step 2 for the lower section.
- Use the standard order process to order the combined board set.
- On the combined PCB, cut along the connection vias with a hacksaw.
- File the cut edges and block sand to smooth. This last step is optional, but makes the boards indistinguishable from being built separately.
Procedure Details
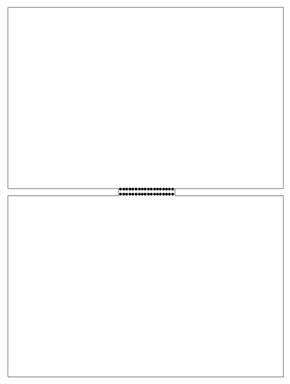
The figure below shows the board outline for the two MiniBoards connected with a “perforation via” component. The holes for the cut lines are lined up such that the via holes are tangent to the edge of the board. This leaves a little bit extra to file off, but allows for a smooth edge on the finished boards.
The 2x multi-board template and the ExpressPCB layout footprint used for the perforations are available using the following links. For most web browsers you can right-click on the link and select “Save Link As…” to save the file to your local hard drive. Instructions on using custom components are available … or on my “Express PCB Custom Components” page here: http://www.planetimming.com/ExpressPCB/expresspcb_custom.htm
Board Template: multi.pcb
Perforation Component: board perforation.p
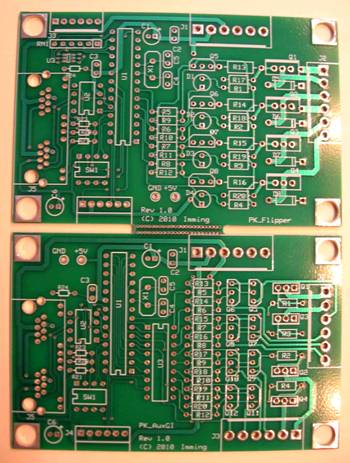
The picture below shows the pair of boards as delivered from ExpressPCB. The connection is very solid. I do not know if you could successfully snap the boards apart and I didn’t try.
The picture below shows the same two boards after been cut apart and the connecting area filed and sanded. This picture was taken in better lighting
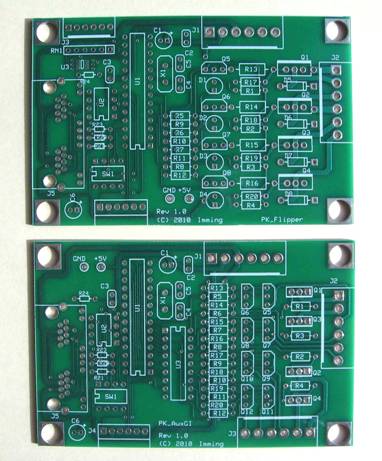
To cut the boards apart, I laid the connected pair flat on my workbench and cut along the existing board edge through the perforation vias. I also tried cutting several boards at a time and the results were not nearly as good; it left much more material that needed to be filed off. While the extra filing did not take too long, in the future I’ll stick to cutting one pair at a time.
To file the sawn edges I clamped the set of boards together and filed them as a group. Once the edge was smooth I used a sanding block on the cut edge of each board to make sure it was smooth and straight. It took very little sanding.
Of course, cleaning up the cut edges is purely cosmetic, but it only took about 30 minutes to cut and finish the edges. The separated boards were indistinguishable from the standard MiniBoards.
PCB Ground Rules
The ExpressPCB help menu provides ground rules that apply to the various board services. A few of the rules that apply to this multi-board project are included here:
- Smallest hole: 0.014”
- Minimum space remaining between adjacent holes: 0.021”
- Minimum spacing from pads/traces to board edge: 0.025”
- Minimum perimeter slot: 0.100” (internal slots are not supported)
Full manufacturing specifications are available on the ExpressPCB web site: http://www.expresspcb.com/ExpressPCBHtm/SpecsMiniboard.htm
Thoughts on Other Options
The ExpressPCB manufacturing specifications warn against “long slots,” but do not provide a detailed limit. While this layout of two 3.8” boards worked out well, using this method for a pair of larger boards could have problems. Ideally there would be several interconnect locations along the junction of the boards, but without the capability of internal slots there is no good way to do that.
Cutting the boards along the row of “perforation” vias worked out very well with the vias working as a saw guide. Given this, it might be possible to use vias along the entire cut line instead of the slots + vias. In this case, you would want to use a single row of slightly larger vias. This would obviously leave the entire edge of the board that would need to be filed and sanded.
I see no reason this approach could not be expanded to three or more boards. Depending on the layout you may end up with cuts and the associated edge clean-up work on more than one side of some boards.
Keywords:
ExpressPCB, MiniBoard, multi-board, perforation vias
Reference:
Cost formula: $245 + ($0.34 * NumberOfBoards * BoardAreaInSquareInches) + ($0.50 * NumberOfBoards) - QuantityDiscount + Shipping
If you have any comments or questions, feel free to contact me.
Kerry Imming – kcimming@pobox.com
Return to Kerry’s home page -> http://www.planetimming.com/
File: multi_pcb.doc Last modified: March 20, 2012